Icon Tutorial
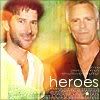
Apr. 21st, 2006 06:28 pmHow to make  from this.
Graphics heavy. I've tried to include all the steps for how to do things, so beginners should be able to follow it. Done in Paintshop Pro 7, but translateable.
Step one: This image doesn't need to be resized - it's small enough to start with. Select the whole image (Ctrl+A) then copy it (Ctrl+C). Open a new, 100x100 pixel canvas and Paste as New Selection (Ctrl+E) - you can thus move it around easily to see where the best crop is :) I did this:

Step two: We play with the automatic colour balance, automatic contrast enhancement, and automatic saturation enhancement tools. (In PSP, you can find these in Effects > Enhance Photo.) My settings were as follows:
Automatic colour balance: Strength 30, Temperature 5121
Automatic contrast enhancement: darker, normal, bold
Automatic saturation enhancement: normal, strong
This gives us this:

Step three: In the layer palette, which you can turn on through clicking the overlapping red and blue squares icon on your toolbars, right click on your base image (it should be called background) and then click promote to layer. Right click again and click duplicate. Do this twice (so you have two 'copy of layer one' layers.) On the right side of the layer palette click on the drop down arrow to set the first layer to 'multiply' and the second to 'screen'. (I've found that this gives you a nicely coloured image without going too bright or too dark, and it works for most images.) The layers, from top to bottom, should be screen layer, multiply layer, base.

Step four: Use this texture by
by ![[livejournal.com profile]](https://www.dreamwidth.org/img/external/lj-community.gif) awmpdotnet set to Hard Light on 100% opacity as a new layer. Take an eraser with its opacity and hardness set low and erase it a little over Jack's face so we can see his lovely smile :D We now get this:
awmpdotnet set to Hard Light on 100% opacity as a new layer. Take an eraser with its opacity and hardness set low and erase it a little over Jack's face so we can see his lovely smile :D We now get this:

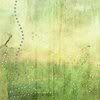
Step five: Use this texture by
by ![[livejournal.com profile]](https://www.dreamwidth.org/img/external/lj-userinfo.gif) hecatesknickers as a new layer set to Hard Light at 87% opacity (slide the little arrow on the layer palette for that layer to the left to change the opacity), then erase at 100% opacity with an eraser on low hardness over their faces and shoulders so that we can see them both. This produces:
hecatesknickers as a new layer set to Hard Light at 87% opacity (slide the little arrow on the layer palette for that layer to the left to change the opacity), then erase at 100% opacity with an eraser on low hardness over their faces and shoulders so that we can see them both. This produces:

Step six: I then used the text tool to write 'heroes' in Century Gothic 11pt using white. We get:

Step six: I added some tiny text around the main text using a brush by![[livejournal.com profile]](https://www.dreamwidth.org/img/external/lj-userinfo.gif) amethystia (you can also just type, of course, in small size text) to add detail. We get:
amethystia (you can also just type, of course, in small size text) to add detail. We get:

Step seven: On a new layer I drew a black one-pixel border around the very edge of the icon, then reduced the layer opacity to 19% so that it was dark enough to show up but not enough to be irritating. This gives us the final icon!

 from this.
Graphics heavy. I've tried to include all the steps for how to do things, so beginners should be able to follow it. Done in Paintshop Pro 7, but translateable.
Step one: This image doesn't need to be resized - it's small enough to start with. Select the whole image (Ctrl+A) then copy it (Ctrl+C). Open a new, 100x100 pixel canvas and Paste as New Selection (Ctrl+E) - you can thus move it around easily to see where the best crop is :) I did this:

Step two: We play with the automatic colour balance, automatic contrast enhancement, and automatic saturation enhancement tools. (In PSP, you can find these in Effects > Enhance Photo.) My settings were as follows:
Automatic colour balance: Strength 30, Temperature 5121
Automatic contrast enhancement: darker, normal, bold
Automatic saturation enhancement: normal, strong
This gives us this:

Step three: In the layer palette, which you can turn on through clicking the overlapping red and blue squares icon on your toolbars, right click on your base image (it should be called background) and then click promote to layer. Right click again and click duplicate. Do this twice (so you have two 'copy of layer one' layers.) On the right side of the layer palette click on the drop down arrow to set the first layer to 'multiply' and the second to 'screen'. (I've found that this gives you a nicely coloured image without going too bright or too dark, and it works for most images.) The layers, from top to bottom, should be screen layer, multiply layer, base.

Step four: Use this texture
 by
by 
Step five: Use this texture
 by
by 
Step six: I then used the text tool to write 'heroes' in Century Gothic 11pt using white. We get:

Step six: I added some tiny text around the main text using a brush by

Step seven: On a new layer I drew a black one-pixel border around the very edge of the icon, then reduced the layer opacity to 19% so that it was dark enough to show up but not enough to be irritating. This gives us the final icon!

no subject
Date: 2006-04-21 06:37 pm (UTC)no subject
Date: 2006-04-21 08:45 pm (UTC)no subject
Date: 2006-04-22 12:24 am (UTC)*Drool*
no subject
Date: 2006-04-22 03:06 am (UTC)no subject
Date: 2006-04-22 08:07 am (UTC)no subject
Date: 2006-04-22 07:16 am (UTC)OH! Also great tute! :)